In a previous instalment, I explained why it was important for you to set up a staging site, from allowing you to break lots of things on your website, to training new webmasters. There are, of course, a number of ways you can do that, which can suit different people or organisations better. Over the next few blogs, I will take you through those, starting with the more manual, cPanel way.
The cPanel Way
For those of you who are not aware, the cPanel is a Linux-based graphical user interface (GUI) which is used as a control panel to simplify the management of your website and its server. It provides all the functionality you would need to be able to publish your website, manage any associated web domains, create mailboxes and forwarders and even manage spam filtering. It is through the cPanel that you would set up your staging site. To do that, I’ve set out the following steps you should follow.
- Create a subdomain
- Create a new database
- Create and assign a new database user
- Export the live database files into the new database
- Copy all WordPress files to the subdomain
- Update the wp_config.php file
- Update all of the URLs in your copied database
This method works best when you have your web domain hosted within the same account as your database, which means you wouldn’t need to update any DNS (Domain Name System) records. In this tutorial, that’s the situation I am presuming you find yourself in. If not, please feel free to leave a comment and I will do my best to give you the advice you need.
#1: Create a Subdomain
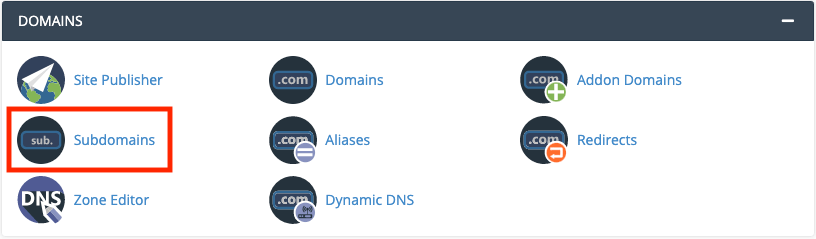
When you’re creating a staging environment for your website, you need to make sure it is effectively separate from the live site, so it doesn’t interference with that site and cannot be found through a simple search. The best way to do that is to create it using a subdomain. You’ll have come across these before in numerous guises. For example, you maybe have seen companies who run a blog on a subdomain, looking something like this: blog.mywebsite.com. In this case, you want to name it something like dev or staging but in reality, it is up to you. To create it, log into your cPanel and select the Subdomains icon in the DOMAINS section.
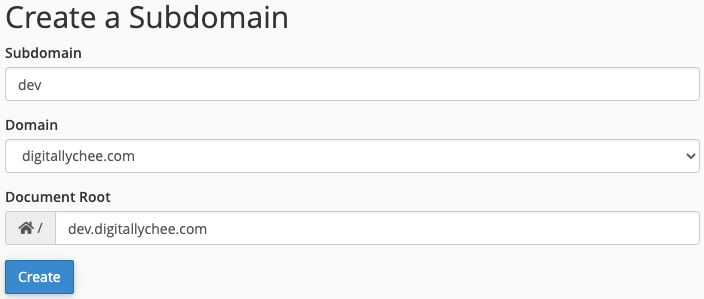
Once you’ve clicked on this, you’ll be taken to a new page, which will allow you to enter the name of your new subdomain. In the first box that appears, you will be allowed to choose the new subdomain, in the Subdomain box. When you do choose your subdomain, the Document Root will automatically populate, so you don’t need to worry about that. The Document Root is in fact the folder to which all your subdomain’s files will be copied, at a later stage. Once you have clicked on Create, you will see a green success message.
#2: Create a New Database
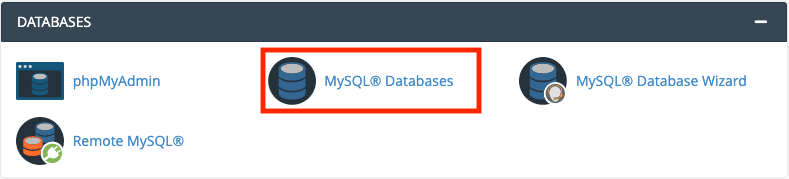
Now that you’ve created the subdomain from which your staging website will be run, you need to create a new database for your staging website. To do this from your cPanel, select MySQL® Databases from the DATABASES section.
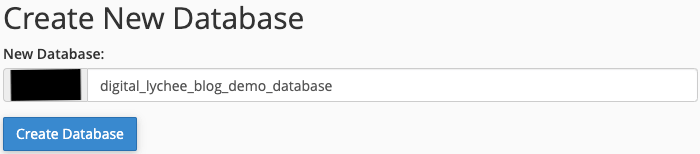
Once the new page has loaded, you simply need to head to the Create New Database section, type in the database’s name and click on Create Database. As in the previous step, you’ll then be greeted with a green success message.
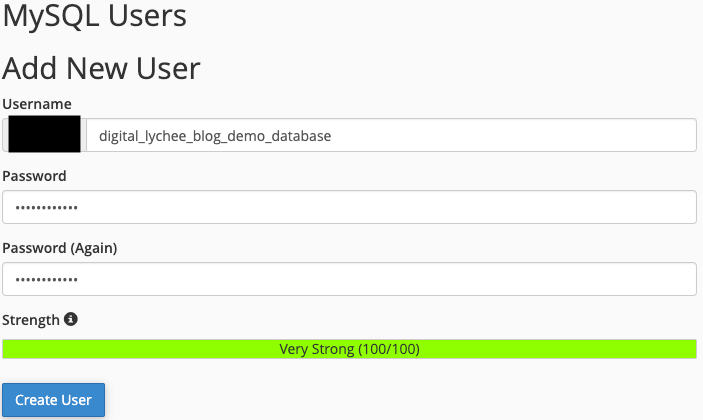
#3: Create and Assign a New Database User
Much like a car needs a driver, or an aircraft (not some military ones though) needs a pilot, your newly created database needs a user. To create this user for your database, in the same MySQL® Databases section of the cPanel, simply head to Add New User under the MySQL Users section. There, all you need to do is create a new username, generate a password and click on Create User. Again, you will see a green success message once you have created the user.
Now, to add the user to the database, you simply need to navigate to Add User To Database, which is directly below Add New User on the same page. Here, simply select the user you just created and the database you created previously, before clicking Add.
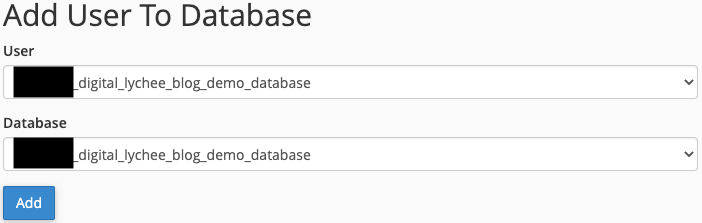
When you do this, you will be taken to a new screen, which is called Manager User Privileges. Simply select ALL PRIVILEGES and then Make Changes. You will see a green success message when this is complete.

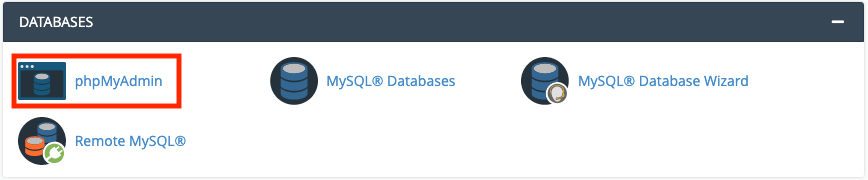
#4: Export the Live Database Files into the New Database
When you create your staging website, you want it to be an exact replica of your live website, to give you the best chance of seeing what any changes you make will look like, when they are published. That’s why you need to copy the website files over, rather than simply starting afresh. To do that, head to the phpMyAdmin page within the DATABASES section of your cPanel.
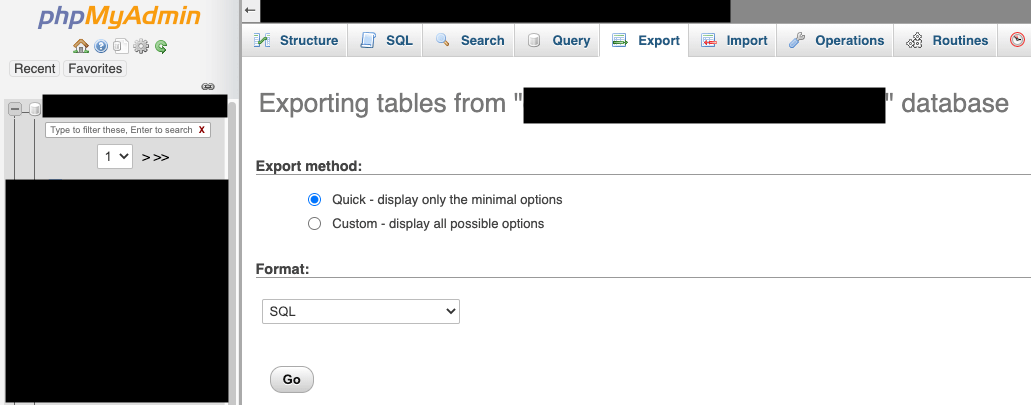
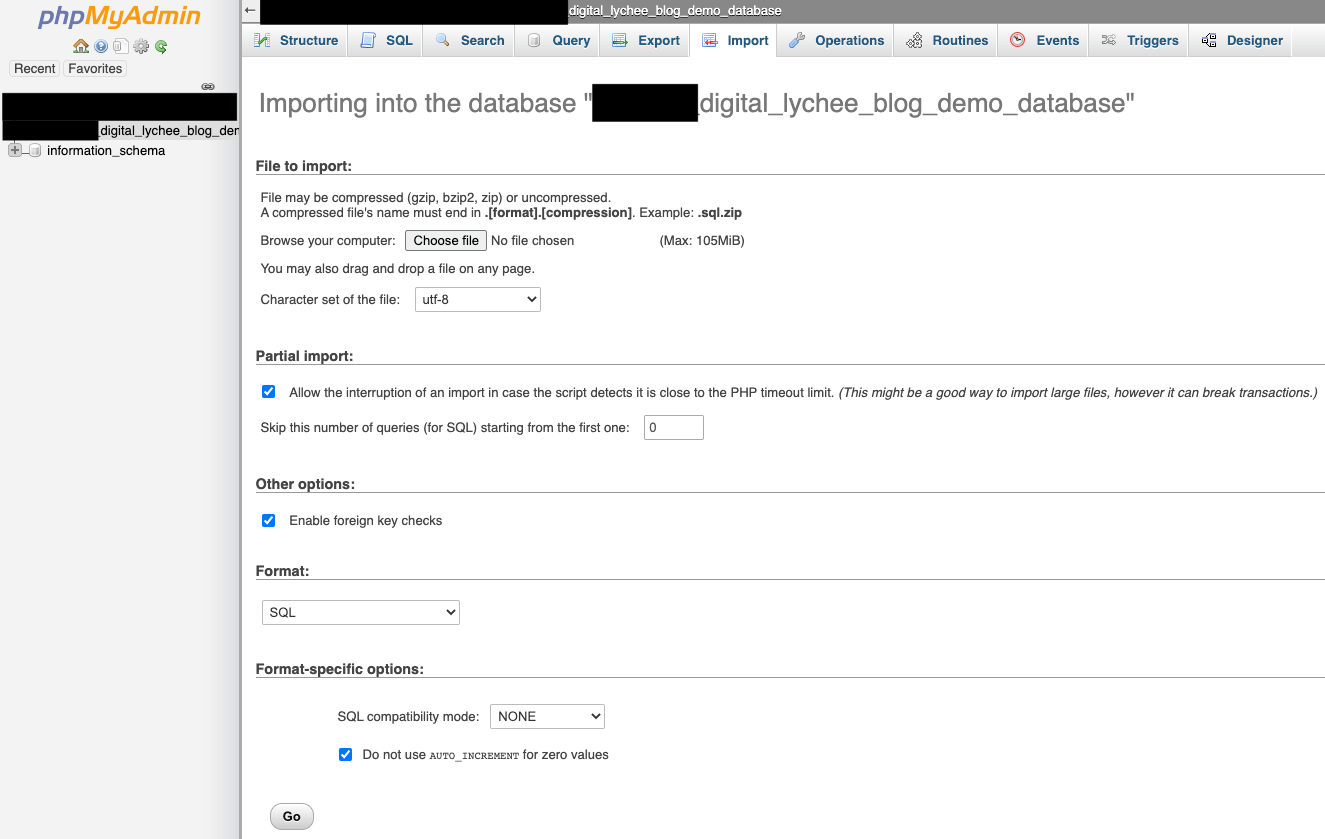
One you have been redirected to your phpMyAdmin section, head to Export. There, you will be greeted with the export window. From there, it is as simple as selecting Go and saving your downloaded database file somewhere you can find it. You can leave the Quick option selected. There’s no need to use any Custom settings.
Next, select the new database from the sidebar menu, head to Import and browse your computer for the file you just exported and select Go. Then, after a brief moment, you should see that all the database files you exported have been imported into your new database.
You need to remember though that as you have copied the database files from the live site, the staging database will default to using the live site’s URLs. You need to change this. Still in phpMyAdmin, ensure you have your new database selected and expanded, and head to the wp_options tab. Here, make sure you edit the siteurl and home properties, to point to your staging site.

#5: Copy all WordPress Files to the Subdomain
By this point, you will have set up your subdomain, database, user and will have imported your live database into your staging one. The penultimate task you must complete is to make sure you transfer all of your files from the live website domain to the subdomain. To do this, select File Manager from the FILES section in your cPanel.

Once you are in your File Manager, in the menu on the left you will notice two files: public_html and dev.digitallychee.com (in my case – yours will be whatever you set your subdomain to be). Essentially, all you need to do is copy and paste the files in public_html folder to your subdomain folder. You can do this by selecting all the files in public_html, right click, select Copy and in the window that appears, change the file path from the default (public_html) to that of your subdomain.

#6: Update the wp_config.php File
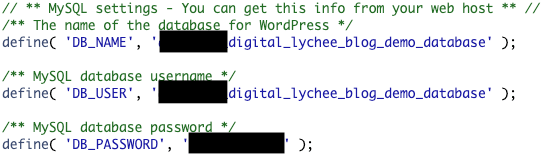
At this point, you’ve set up your subdomain, set up your database and you have copied over your website files to the subdomain folder. The problem is, the files you have copied over are still looking for the database of the live site. To remedy this, simply right-click on wp-config.php within your subdomain folder, select Edit and then Edit again. There are three characteristics that you need to change here. These are: DB_NAME; DB_USER; DB_PASSWORD. These should be changed to the values we created in previous steps.
#7: Update All of the URLs in your Copied Database
By this point, you have completed everything you need to do within your cPanel, to set up your staging website. There is, however, one final thing to sort. Throughout your staging website’s database, there are still likely to be references to the live site’s URL. That can pose quite a problem, which needs to be sorted. But don’t worry, it is simple to sort, with a plugin.
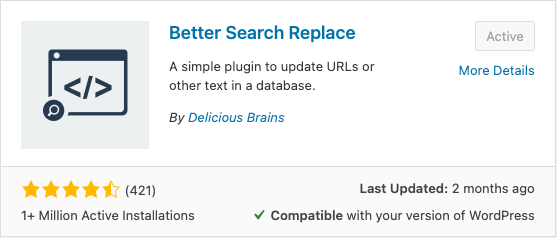
Basically, you need to install a plugin that will look through your database and update any URLs to point to your staging website. In my case, this would involve updating https://digitallychee.com to https://dev.digitallychee.com. There are many plugins you could use, although the one I use for my WordPress website is called Better Search Replace.
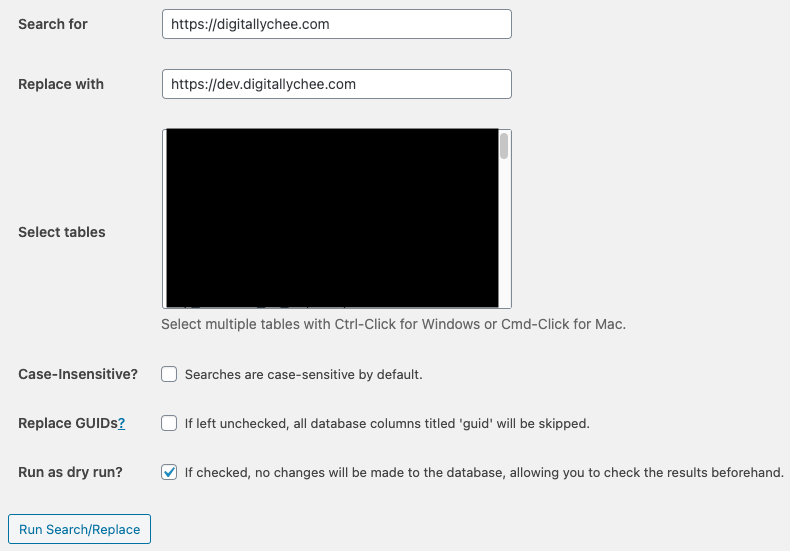
Once installed, you will find the plugin at Tools > Better Search Replace. This will of course vary, depending on the plugin you choose to install. Next, you need to add your live domain into the Search for box, your staging domain into the Replace with box and click on Run Search/Replace. You’ll notice a tick box which asks if you want to do a dry run first. That can be useful, just to see if you actually do need to make any changes and it could also catch any errors you have made typing in the domains, before you make your changes, so you don’t end up with problems later.
How will Digital Lychee Help You?
If you have followed the above steps and you haven’t run into any issues, then voila, you’ve got a functioning staging website! If you’ve got any comments or questions about the blog, then please don’t hesitate to ask, by leaving a comment, or sending me an email.
For all my clients, if I am helping to build you a website, then I will ensure a staging environment is set up, so that we can agree on the new design, before it is published. I would love to hear from you, to help you get started on your digital journey. You can get in touch with me here.
